
Last Updated: November 1, 2026
Quick Summary
To add sand traps backyard putting green owners can build, excavate a basin about 6 to 10 inches deep, install a sloped drainage layer with an outlet, lay a liner, then add 3 to 4 inches of washed, angular bunker sand. Plan the location and size first, and call 811 before digging.
- Dig the bunker basin 6 to 10 inches deep with shallow slopes you can rake and walk on.
- Slope the drainage base 1 to 2 percent toward the outlet, roughly 1/8 to 1/4 inch per foot.
- Use washed drainage aggregate, typically 3/4-inch to 1-inch, placed 2 to 4 inches deep.
- Choose washed, angular bunker sand with particle sizes between 0.25 mm and 1.0 mm.
- Add 3 to 4 inches of sand in layers, raking level after each pass, and test drainage before adding sand.
Table of Contents
- Why Add a Bunker to a Backyard Putting Green
- Planning the Location and Size of Your Backyard Golf Bunker
- Excavating and Shaping the Bunker Basin
- Building the Drainage Layers and Outlet
- Installing the Liner and Putting Green Bunker Edging
- Choosing the Right Sand and Setting Backyard Bunker Sand Depth
- Booking Your Bunker Project With Southern Artificial Turf
- Frequently Asked Questions
Why Add a Bunker to a Backyard Putting Green
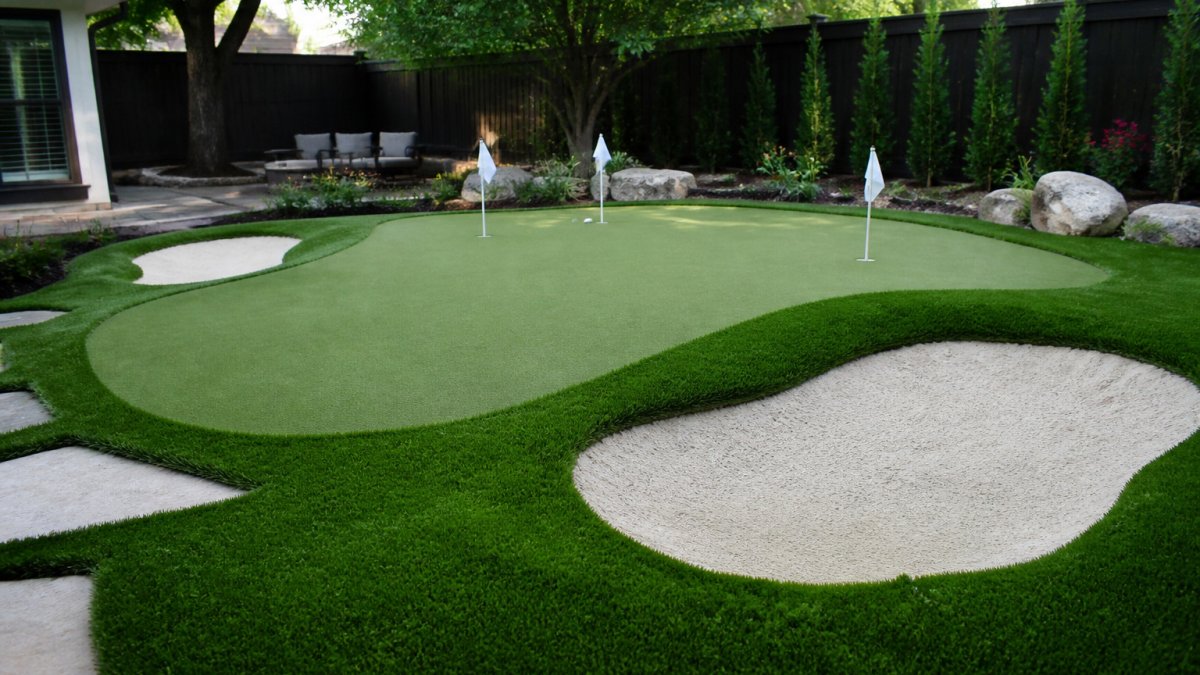
Adding a sand trap to a backyard putting green gives you a practice area that feels like a real course, and the sand traps backyard putting green setup lets you rehearse bunker shots at home.
A bunker does more than look good. It gives you a place to practice recovery shots from sand, which is a skill most casual players rarely work on.
The main reasons homeowners add a bunker include:
- Practice on demand: Work on sand shots any time, without driving to a course or range
- Realistic feel: Sand responds differently from turf, so practice builds real touch
- Better short game: Regular bunker practice improves control on short approach shots
Most of the work happens before the first shovel goes in.
Planning the Location and Size of Your Backyard Golf Bunker
Start by choosing a spot that makes sense for both play and drainage.
Measure the area before you dig. A practical starting size for a backyard bunker is about 8 to 12 feet long and 4 to 6 feet wide.
Consider these planning points before you start:
- Sun exposure: Full sun keeps the sand dry, but check that it does not overheat the turf
- Access: Leave room to walk around the bunker and rake it
- Underground utilities: Call 811 before digging to locate buried lines (811 Before You Dig)
Sketch the layout on paper first. Mark the bunker outline with stakes and string so you can see how it fits in the yard.
Excavating and Shaping the Bunker Basin
Once the layout is set, dig out the bunker basin to the depth your design calls for.
Work in stages rather than digging everything at once. Remove the sod or surface layer, then excavate the basin floor.
A common mistake is digging the floor flat. A slight slope toward one outlet point helps water leave the bunker faster.
Shape the rim so it blends into the surrounding yard.
Building the Drainage Layers and Outlet
Drainage is the part most people underestimate. See how drainage systems extend putting green life over the long term.
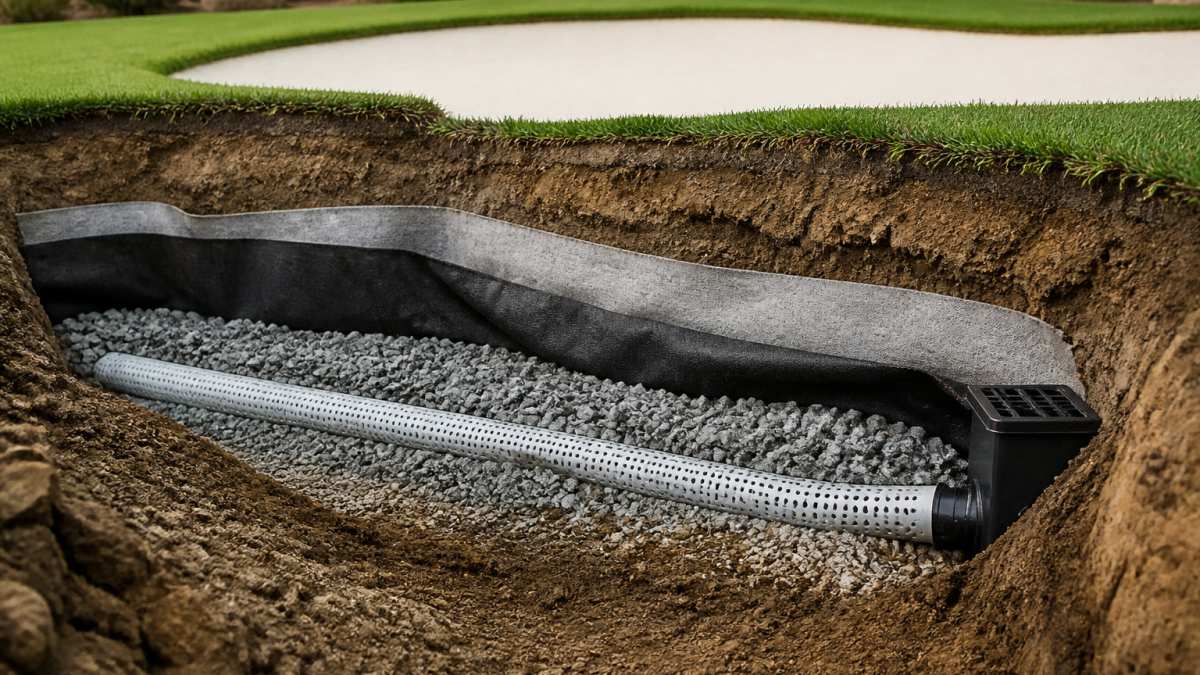
A complete backyard bunker drainage system has four parts, and each one needs a specification:
- Compacted subgrade: The excavated floor, graded to a 1 to 2 percent slope toward the outlet. That is roughly 1/8 to 1/4 inch of fall per foot. A 10-foot-long bunker should drop about 1.25 to 2.5 inches from the high end to the outlet.
- Drainage aggregate: Clean, washed crushed stone, typically 3/4-inch to 1-inch washed gravel, placed 2 to 4 inches deep over the subgrade. Avoid limestone fines or crusher run in this layer; the fines clog and slow water movement. The aggregate is the reservoir that holds water until it exits.
- Outlet pipe: A 2-inch to 4-inch perforated or solid drain pipe, depending on whether you are collecting water along the floor or simply carrying it from a low point. Slope the pipe at a minimum of 1 percent, and 2 percent is better. A 20-foot run at 2 percent drops about 4.8 inches.
- Discharge point: A dry well, a pop-up emitter, a French drain, or a graded swale that carries water away from the bunker and away from the putting green. The discharge must be lower than the bunker floor, or water will sit in the pipe.
A bunker with no working outlet will hold water after heavy rain, and the sand will turn to mud within a few storms. Check the discharge point during a heavy rain before you add sand. If water pools at the outlet, regrade or extend the line.
Two details separate a drainage system that works from one that clogs:
- Filter fabric: Line the gravel trench with a non-woven geotextile before adding aggregate. The fabric keeps soil fines out of the gravel and pipe. Wrap the fabric over the top of the gravel before backfilling.
- Cleanouts: If the run is longer than about 15 feet, add a cleanout or a removable cap at the high end so you can flush the line if it silts up.
Slope the base layer toward the outlet so water moves in one direction.
Before you cover the drainage with liner and sand, test it.
Installing the Liner and Putting Green Bunker Edging
A liner keeps the sand from mixing into the soil below and helps control moisture. Lay a durable poly liner over the drainage layer, smoothing out wrinkles and leaving enough overlap at the seams to prevent gaps.
Secure the edges and install edging around the rim. Edging holds the sand in place and gives the bunker a clean border where it meets the synthetic turf. Learn how to repair seams in artificial putting greens where the bunker meets the green.
Where the bunker meets the putting green, the turf edge should sit flush with the edging. Check that the transition is smooth so the ball rolls predictably from the green into the sand.
Choosing the Right Sand and Setting Backyard Bunker Sand Depth
Sand selection is where most backyard bunker projects go wrong, and it is the topic the ranking pages cover least concretely. See real installed bunkers and infill examples before you choose your sand. The right sand is not simply ‘beach sand’ or ‘play sand.’ Bunker sand is specified by particle size, shape, and drainage rate, and those properties determine how the ball behaves and how the bunker holds up.
Sand selection criteria
Use these criteria when you call suppliers:
- Particle size: Bunker sand typically falls in the medium-to-coarse range, roughly 0.25 mm to 1.0 mm, with most of the material between 0.25 mm and 0.5 mm. Ask for a sieve analysis or gradation report. A sand with too many fines below 0.15 mm packs hard and drains slowly.
- Angularity: Angular grains interlock and resist displacement, which gives a firmer surface and better ball support. Rounded grains shift more easily and can play softer. Washed concrete sand and manufactured angular sand are common choices; fine play sand is usually too rounded and too fine.
- Drainage rate: The sand should drain fast enough that water does not stand on the surface after rain. A well-graded, washed sand in the size range above typically drains at a rate that keeps the surface firm within an hour or two of heavy rain, though actual performance depends on the drainage layer below.
- Cleanliness: Specify washed sand with minimal silt and clay. Dirty sand clogs the drainage layer and turns the bunker into a bathtub.
Ask the supplier for a sample before you order. Squeeze a handful: if it holds a tight clump that does not crumble, it has too many fines. Good bunker sand should feel gritty and fall apart when you open your hand.
Sand depth
Set the sand depth with care. A common target for practice bunkers is 3 to 4 inches of sand over the drainage layer, but the right depth depends on the shot you want to practice.
Too little sand exposes the liner and makes the surface feel hard. Too much sand makes the ball sink and slows practice, and it can bury the drainage layer under fines over time.
Calculating how much sand you need
Sand is sold by the cubic yard or by the ton, and the quantity is easy to calculate:
- Measure the bunker footprint in square feet. For an irregular shape, break it into rectangles and triangles and add the areas.
- Multiply by the sand depth in feet. For 3.5 inches, use 3.5 ÷ 12 = 0.29 feet.
- Divide by 27 to convert cubic feet to cubic yards.
A worked example: an 8-foot by 10-foot bunker is 80 square feet. At 3.5 inches deep, that is 80 × 0.29 = 23.2 cubic feet, or about 0.86 cubic yards.
Sand weighs roughly 1.2 to 1.4 tons per cubic yard when damp, so a 1-cubic-yard order is often around 1.25 tons. Confirm the weight per yard with your supplier, because moisture content changes the number.
Adding and settling the sand
Add sand in layers and rake it level after each pass. Check the depth at several points so the surface stays even. Sand is commonly sold by the cubic yard or by the ton, so ask suppliers for quotes.
For the best results, follow these steps when adding sand:
- Spread sand evenly across the basin in 1- to 2-inch lifts
- Rake to remove footprints and smooth the surface
- Check the depth and top up low spots
- Water lightly to settle the sand, then let it dry
The two specifications that matter most are washed, angular sand in the 0.25 mm to 0.5 mm range and a drainage layer that slopes to a working outlet. Get those right, and the sand depth becomes a tuning choice rather than a repair job.
USGA recommendations on bunker sand particle size and shape
The table below summarises the key sand and depth specifications from this section.
| Item | Value | Note |
|---|---|---|
| Particle size | 0.25 mm to 1.0 mm | Most material between 0.25 mm and 0.5 mm |
| Angularity | Angular grains | Interlock and resist displacement |
| Cleanliness | Washed sand | Minimal silt and clay |
| Sand depth (practice bunker) | 3 to 4 inches | Common target over drainage layer |
| Shallow depth | 2 to 3 inches | Firmer play, chunk-and-run escapes |
| Deep depth | 4 to 5 inches | Softer play, open-faced explosion shots |
| Sand weight | 1.2 to 1.4 tons per cubic yard | Damp sand; confirm with supplier |
Booking Your Bunker Project With Southern Artificial Turf
Building a bunker takes planning, digging, drainage work, and careful finishing. Compare DIY and professional putting green installation to decide which route suits your yard. If you would rather have a professional handle the job, you can contact Southern Artificial Turf to discuss your project.
Our turf is designed with non-abrasive polyethylene fibers and offers 30 inches per hour of drainage capacity.
For current pricing, contact Southern Artificial Turf for a quote tailored to your yard.
Frequently Asked Questions
How do you build a sand trap next to a backyard putting green?
Mark the bunker outline beside the green, excavate the basin to the planned depth, then compact the subgrade. Build a base layer of crushed stone for drainage, lay a liner if you use one, and install edging to hold the sand. Finish by filling with washed bunker sand and raking it smooth. Work in stages and check slope as you go so runoff drains away from the green rather than into the bunker.
How deep should a backyard putting green sand trap be?
Most backyard bunkers are shallow, typically 3 to 4 inches of sand over the base, with the basin excavated deep enough to allow for the drainage layer. The sand should be deep enough to play a short bunker shot without the ball sitting on the base, but not so deep that it becomes hard to hit out of. Start shallower and add sand as needed, since over-filling is harder to correct than under-filling.
What type of sand should you use in a backyard golf bunker?
Use a washed, angular bunker sand with consistent particle size and good drainage, sold at most landscape suppliers. Avoid play sand, which is too fine and compacts, and avoid beach sand, which is rounded and can wash out. Buy from a supplier that can confirm the grain size and bulk quantity you need, since pricing depends on quantity, delivery, and local availability.
How do you keep sand from spilling onto artificial turf?
Install a containment edge around the bunker, such as a sand-retention border, timber, or a poly liner set above grade, so the sand stays in the basin. Keep the bunker lip at the same height as the surrounding turf, and rake sand back inside after play. Regular raking and a sand-retention edge do most of the work over time.